Saturday, April 19, 2014
Hi everyone,
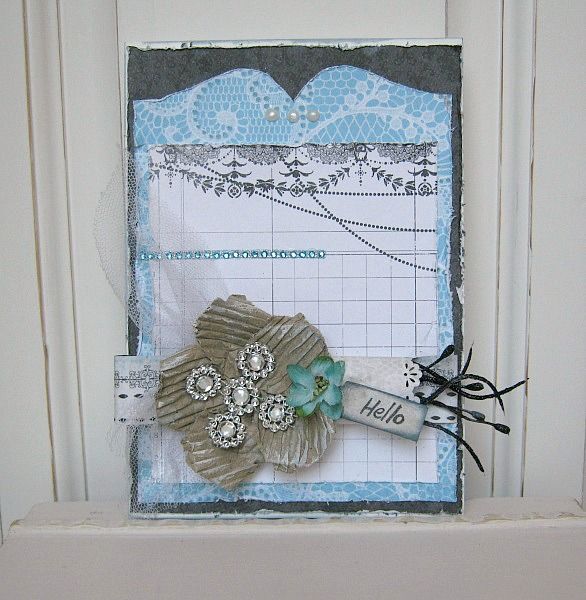
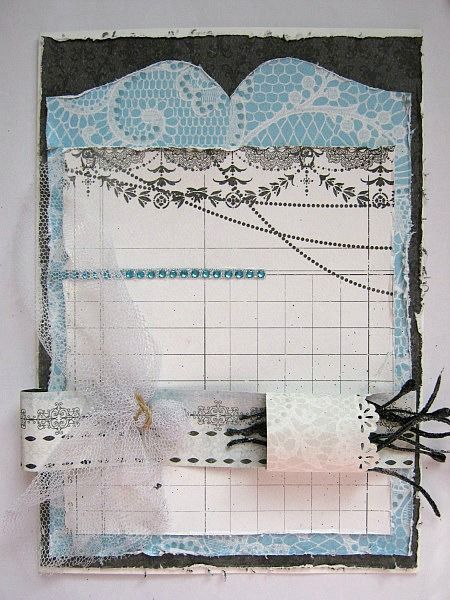
Here's my latest card using the gorgeous April kit.
And this is how it came together:
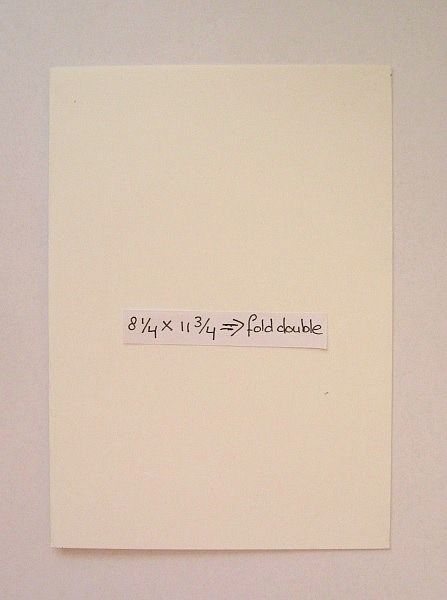
For my base card, I cut a piece of cream colored cardstock, 8.1/4 x 11.3/4, and folded it double.
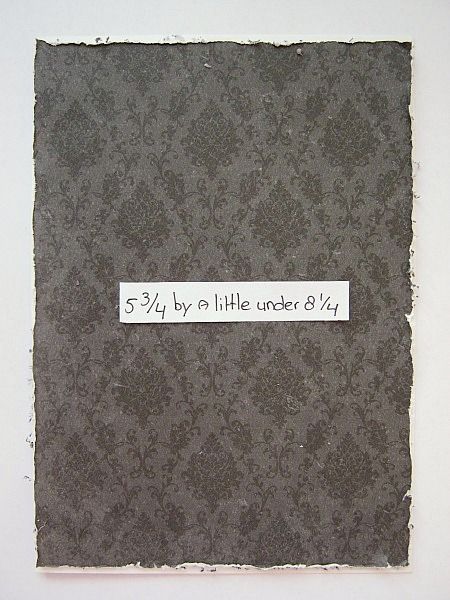
For my first layer, I cut a piece of PP at 5.3/4 by, a little under 8.1/4 Distressed the edges and glued it to my base card.
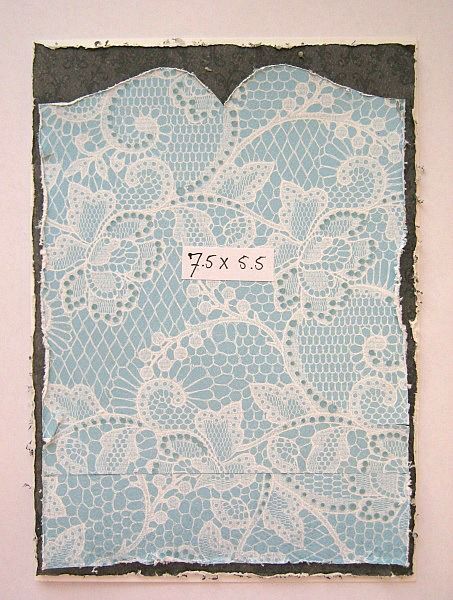
For my second layer, I cut a piece of PP at 7.5 x 5.5 and then gave the top a little shape. (I had to do mine in 2 parts, because of working with my left-overs) Distressed the edges, but didn't glue it down yet.
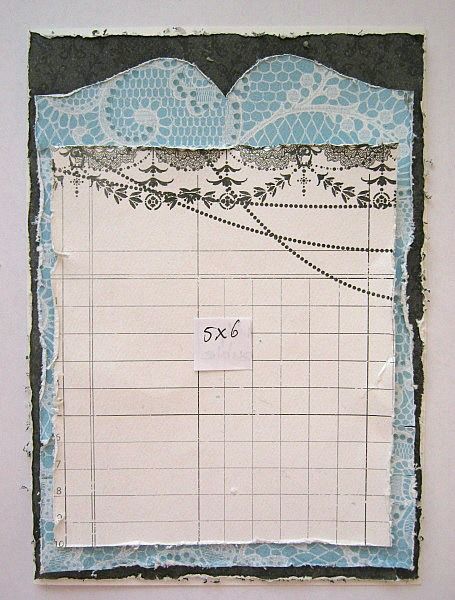
The next layer was cut at 5 x 6 I distressed the edges and glued it to the blue lacey paper.
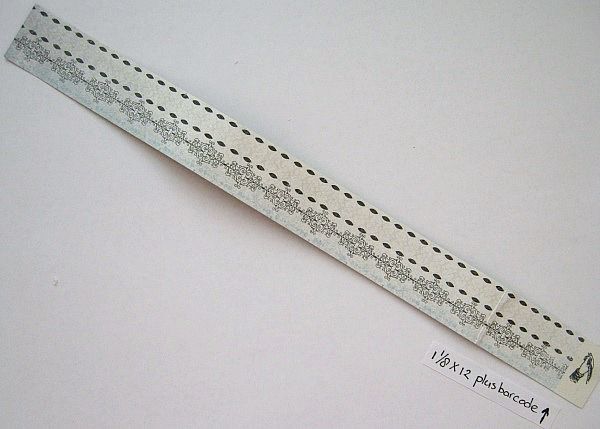
Then I cut this strip, which measures 1.1/8 x 12 PLUS that little barcode end.
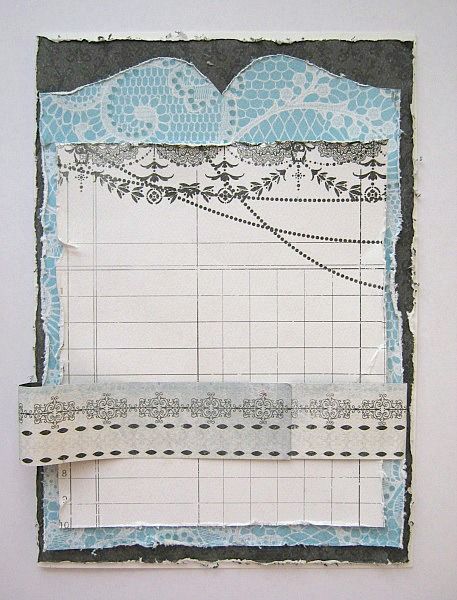
Folded the strip around the 2 layers (the blue and the white) and at this point I only glued the
2 ends together. On the right side, I pressed it down to get a nice folding line, then flipped it over, and secured on the backside of the blue paper, with a drop of glue.

Then on the front, I added a drop of glue, under the strip, where the red mark is.
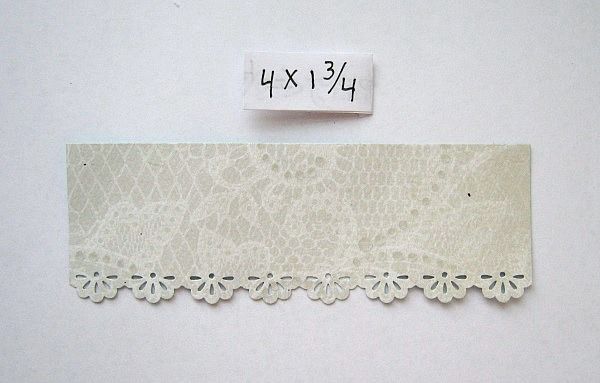
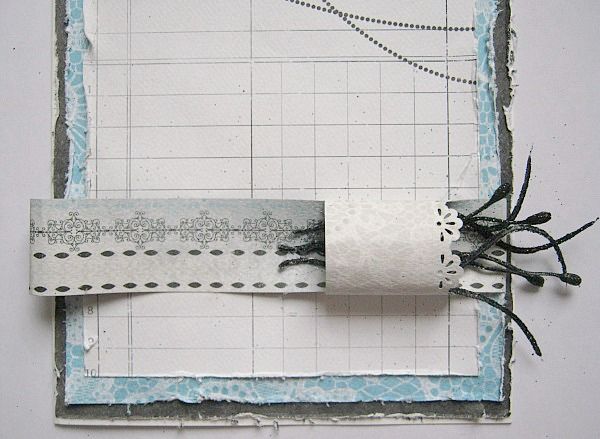
Then for a fun detail, I cut a strip of paper at 4 x 1.3/4 and I used a border punch at 1 end.
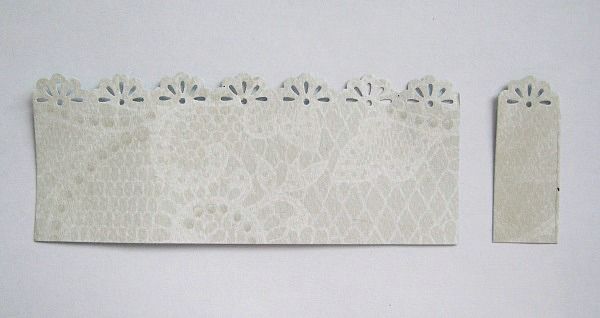
I cut 1 little part off, this is going to be a tag for my sentiment.
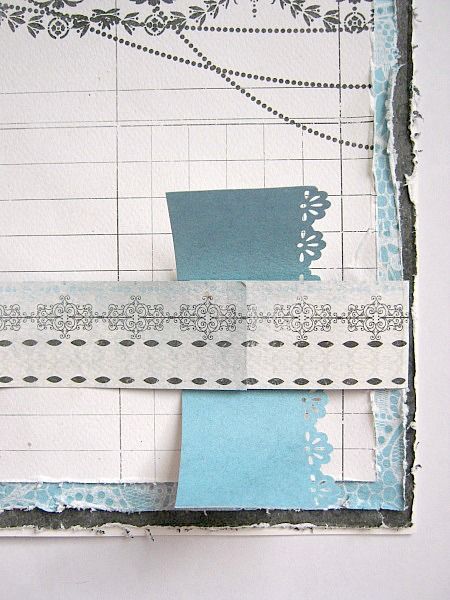
I slided this punched paper under the paper strip
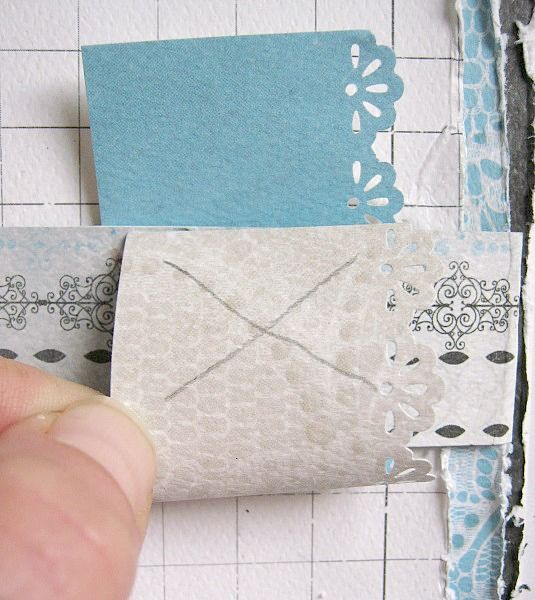
On the cross marked spot, I added glue
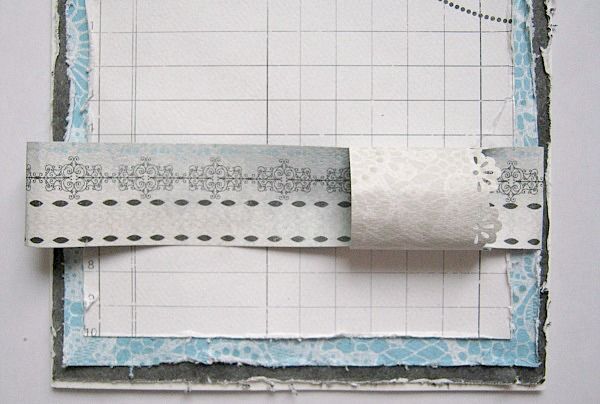
and glued it together. The seam was rolled back under the paper strip.
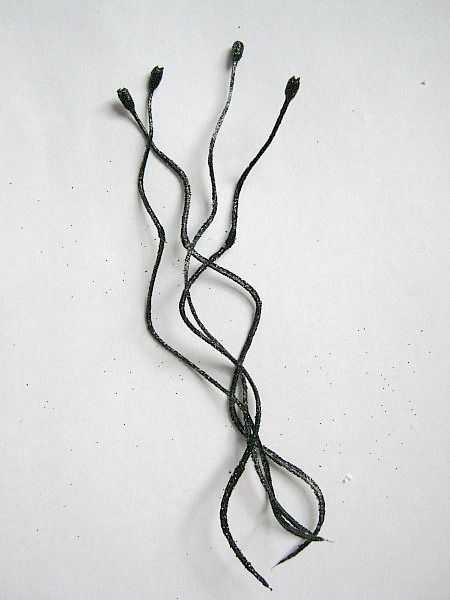
Then I took 4 of these sprigs
fold them double - cut the loops - and glued them in place
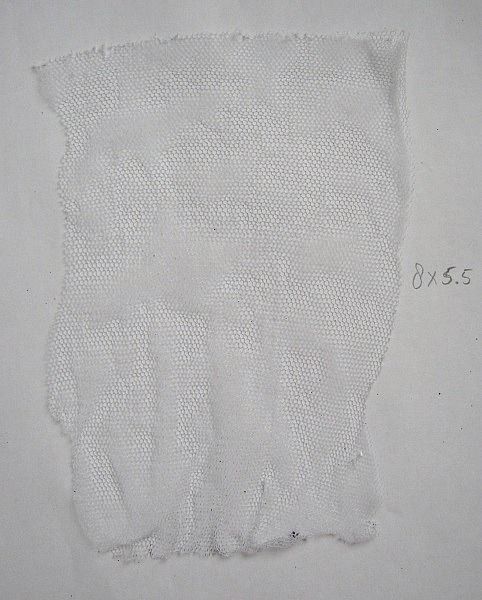
I cut a piece of tulle at 8 x 5.5 (you can use cheesecloth just as well)
ruffled it up and tied it together with some twine and glued it in place. I also glued a string of the blue bling, like in the picture.
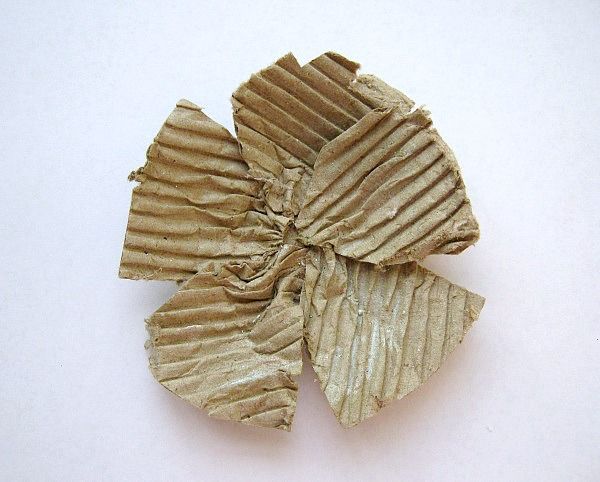
Then from corrugated cardboard, I cut some petals and made a flower out of it.
*****TIP*****
For my corrugated cardboard: I used the box our kits comes in. Cut a 6x6 square out of it, sprayed it with water, let it sit for a few seconds, and then peeled off the top paper layer, and there you have your own corrugated cardboard.

I rounded the petals a little by rolling the edges between my fingers. Then from the gorgeous bling that came in our kit, I cut a (dice) figure 5 out to dress up the center of the flower. Using some hot glue, I glued my flower in place, just like this.

Filled the cap with a tiny flower.
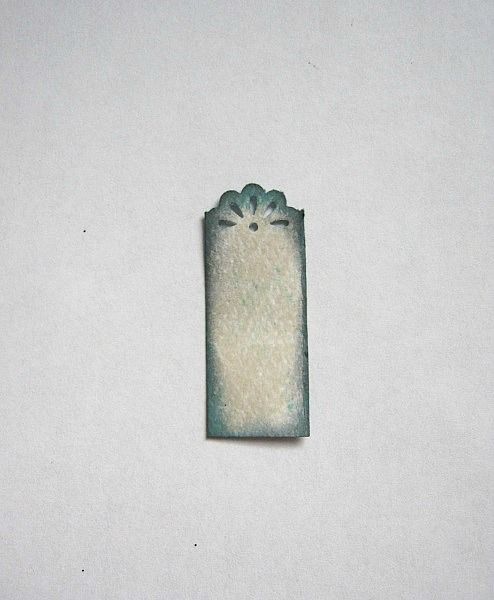
I inked up the little tag
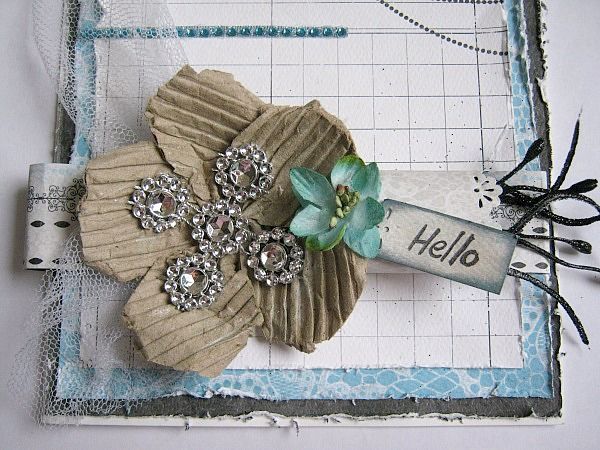
wrote my sentiment on it, and glued it in place.
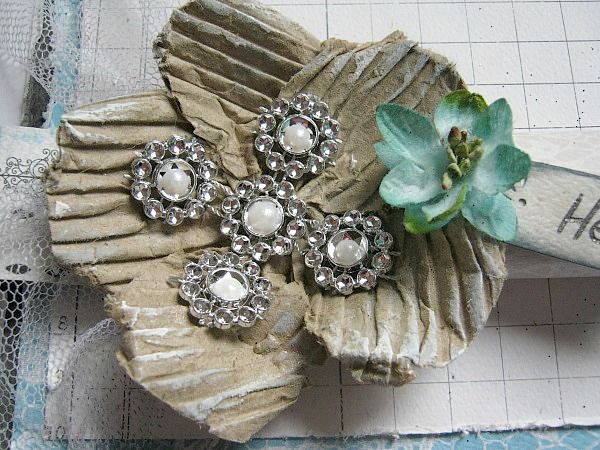
Then for detail I added some ink and gesso to my flower and added(liquid) pearls in the center of the bling
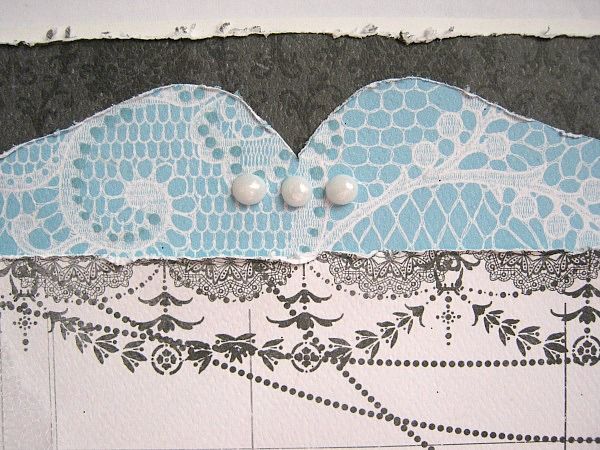
and of course, some on the top of my card as well.
and I called it done! I hope you like it.

And this is how it came together:

For my base card, I cut a piece of cream colored cardstock, 8.1/4 x 11.3/4, and folded it double.

For my first layer, I cut a piece of PP at 5.3/4 by, a little under 8.1/4 Distressed the edges and glued it to my base card.

For my second layer, I cut a piece of PP at 7.5 x 5.5 and then gave the top a little shape. (I had to do mine in 2 parts, because of working with my left-overs) Distressed the edges, but didn't glue it down yet.

The next layer was cut at 5 x 6 I distressed the edges and glued it to the blue lacey paper.

Then I cut this strip, which measures 1.1/8 x 12 PLUS that little barcode end.

Folded the strip around the 2 layers (the blue and the white) and at this point I only glued the
2 ends together. On the right side, I pressed it down to get a nice folding line, then flipped it over, and secured on the backside of the blue paper, with a drop of glue.

Then on the front, I added a drop of glue, under the strip, where the red mark is.

Then for a fun detail, I cut a strip of paper at 4 x 1.3/4 and I used a border punch at 1 end.

I cut 1 little part off, this is going to be a tag for my sentiment.

I slided this punched paper under the paper strip

On the cross marked spot, I added glue

and glued it together. The seam was rolled back under the paper strip.

Then I took 4 of these sprigs

fold them double - cut the loops - and glued them in place

I cut a piece of tulle at 8 x 5.5 (you can use cheesecloth just as well)

ruffled it up and tied it together with some twine and glued it in place. I also glued a string of the blue bling, like in the picture.

Then from corrugated cardboard, I cut some petals and made a flower out of it.
*****TIP*****
For my corrugated cardboard: I used the box our kits comes in. Cut a 6x6 square out of it, sprayed it with water, let it sit for a few seconds, and then peeled off the top paper layer, and there you have your own corrugated cardboard.

I rounded the petals a little by rolling the edges between my fingers. Then from the gorgeous bling that came in our kit, I cut a (dice) figure 5 out to dress up the center of the flower. Using some hot glue, I glued my flower in place, just like this.

Filled the cap with a tiny flower.

I inked up the little tag

wrote my sentiment on it, and glued it in place.

Then for detail I added some ink and gesso to my flower and added(liquid) pearls in the center of the bling

and of course, some on the top of my card as well.
and I called it done! I hope you like it.
Wishing you all a Beautiful weekend!!!
Subscribe to:
Post Comments (Atom)

Be sure to "LIKE & FOLLOW" Swirlydoos for special FB only deals and promos
Follow this blog with bloglovin

Scrapbook Sketches

see all of our sketches here
Keep Tabs On Our Blog!


Popular Posts
-
 Welcome to: Swirlydoos Kit Club February Scrapbook Kit Reveal & Blog Hop! Swirlydoos is proud to bring you our beautiful Febr...
 -
 Thank you for joining us today for our ONE DAY blog hop featuring our September kit collection, Gilted Pleasure . **All collec...
 -
 Welcome to Swirlydoos November Kit Reveal Blog Hop BLOCK PARTY!!! That's right, we are having a party and you are all invit...
 -
 Welcome to Swirlydoos' June Kit Reveal Blog Hop Block Party!! We are so pleased to show off our June kit, Antiquities!!! This kit...
 -
 Welcome to Swirlydoos' March Kit Reveal Blog Hop Block Party!! We have some amazing projects for you to see today and as a bonus...
 -
 Welcome to Swirlydoos' Mystical Winter kit reveal Blog Hop Block Party!! Happy New Year and Welcome!!! This month's kit,...
 -
 Welcome to: Swirlydoos Kit Club March Scrapbook Kit Reveal & Blog Hop! Swirlydoos is proud to bring you our beautiful March co...
 -
 SCROLL DOWN FOR THE 12 DAYS OF CHRISTMAS CONTEST: DAY FIVE! Welcome to: Swirlydoos Kit Club December Scrapbook Kit Reveal & Blo...
 -
 Welcome back! We have a really fun blog hop all set for you today. Our May kit, So Chic , is well.....just that...so chic! This kit is ...

2 comments:
fabulous card.Stunning and beautiful accents.. great tutorial
Gorgeous, gorgeous, gorgeous!!!!
I love the way that you've used the scraps and sprigs and your flower is fantastic!!!