Saturday, September 27, 2014
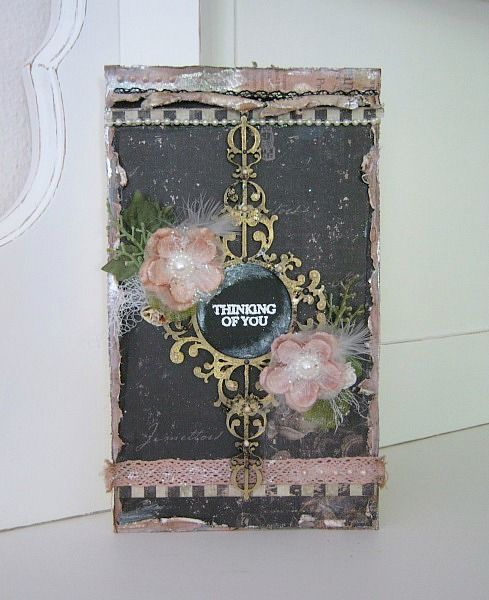
Using our Super GORGEOUS September, "Vintage Love" kit
I created this card.
And of course..... We at Swirlydoos love to share!!!!

And of course..... We at Swirlydoos love to share!!!!
So I did a step by step tutorial for you. Here we go:
****************************************************************************

For my background I cut a piece of PP at 5.1/8 x 8.3/4

Using my Distress ink (Tattered Rose & Spun Sugar) I got around the edges of the paper. Then I gently, distressed the edges and inked them with Vintage Photo Distress ink.

Then I cut my second layer of PP at 5 x 8.1/2

I trimmed the edges with deco scissors. This way it is easier to "heavy" distress.

Distressed the edges using the Ingvild Bolme, distressing tool.

Then I glued the second layer to the first and with a little gesso I rubbed the edges. I glued both of these layers to my base card.

I cut the black lace in half

And glued it at the top like so.

I changed the color of the pink lace, by simply using my Vintage Photo Distress inkpad. Swiped it over my craftmat, and spritzed it with water. Then when you add the lace, make sure it is all saturated. Squeeze the lace out and dry with a heat tool.

I glued it at the bottom of my card.

Then I cut 2 of these tiny little strips. On one of the barcode strips there is this print. I cut the barcode strip in half. (lenght-wise)

I inked the edges and glued them at the top, right under my fold back edge, and at the bottom, right under the lace.

I glimmer-misted this beautiful Chipboard piece in gold. Then after it dried I added some multi medium and the mica flakes, that came in the Main Kit, in various spots. After that dried I went over it with a little Inka gold.

I hold the chippie to my card and with a pencil.........

I traced the inner circle.

Then I took some black gesso, (you can use black paint fot it too) and rubbed with my finger over the marked circle.

I stamped and embossed my sentiment.

Then I glued my CB frame to the card.

I glued some tiny featers behind the already beautiful Prima flowers that came in the Main Kit.

And started playing with layering flowers and leaves. As you can see, I always cut my leaves in pieces, to get more use out of them.

Glued the flowers and leaves in place.

I added some pearl strand to the top.

And I brought some hihglights to the center, using Gesso.

I added some liquid pearls to the CB frame, to add even more interest.

and also to the top of the card

and of course the bottom of the card.
And I called it done. I hope you like it.
Have a lovely, creative weekend!
Subscribe to:
Post Comments (Atom)

Be sure to "LIKE & FOLLOW" Swirlydoos for special FB only deals and promos
Follow this blog with bloglovin

Scrapbook Sketches

see all of our sketches here
Keep Tabs On Our Blog!


Popular Posts
-
 Welcome to: Swirlydoos Kit Club February Scrapbook Kit Reveal & Blog Hop! Swirlydoos is proud to bring you our beautiful Febr...
 -
 Welcome to Swirlydoos November Kit Reveal Blog Hop BLOCK PARTY!!! That's right, we are having a party and you are all invit...
 -
 Welcome to Swirlydoos' Mystical Winter kit reveal Blog Hop Block Party!! Happy New Year and Welcome!!! This month's kit,...
 -
 Welcome to Swirlydoos' March Kit Reveal Blog Hop Block Party!! We have some amazing projects for you to see today and as a bonus...
 -
 Thank you for joining us today for our ONE DAY blog hop featuring our September kit collection, Gilted Pleasure . **All collec...
 -
 Welcome to Swirlydoos' June Kit Reveal Blog Hop Block Party!! We are so pleased to show off our June kit, Antiquities!!! This kit...
 -
 SCROLL DOWN FOR THE 12 DAYS OF CHRISTMAS CONTEST: DAY FIVE! Welcome to: Swirlydoos Kit Club December Scrapbook Kit Reveal & Blo...
 -
 Boy, oh boy do we have a stellar hop for you this month!! Just when I think that Krissy couldn't possibly created a prettier ki...
 -
 Welcome to Swirlydoos' February Blog Hop Block Party!! Welcome to Swirlydoos February Kit Reveal Blog Hop BLOCK PARTY!!! ...
 -
 Welcome to Swirlydoos December Kit Reveal Blog Hop BLOCK PARTY!!! We are having a party and you are all invited. We have some amazing projec...
4 comments:
WOW! Beautiful! I love it! <3
Such a pretty card, Paulien!!!
I love the softness of the feathers and flowers and that chippie is gorgeous!!!!!
Gorgeous,thank you for the awesome idea and using deco scissors for heavy distressing!!! That is a great idea especially good use for an "old" item :)!!!
Fabulous creation. i too like the feathers and flowers. Goes well together.