Saturday, July 18, 2015
As promised in an earlier post, I will be sharing how I scrap even when I get down to the bare bones of a kit. Typically I get 8-9 layouts from each kit. My style does change from shabby chic to more grunge as I get to the end of a kit. But, I love the girly grunge and the clean and simple for some of my pictures. I don't know about you but I hate feeling like all my pages look alike. For this reason, I love doing different styles.
Here's a picture of what's left of my June kit after creating seven 12x12 layouts.
Looks like a mess, huh? As many of you know, I scrap with my sister a lot. She will spend the weekend at my house and that is all we do. We used to go to all day crops at our church. Sometimes we even challenge each other long-distance. Anyway, one time we challenged each other to use only the scraps on our table to make a layout. Her layout was awesome! I use that technique when I get to the end of a kit-just use what's on my table and make a layout. Everything goes together so it's just up to me to put it together.
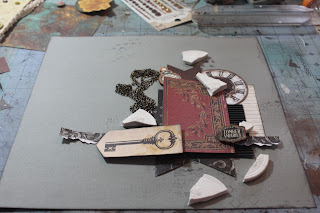
Let me share my process with you. I first took the large cameo from the add on kit and busted it into pieces. It did not break easily! So, don't worry about them being fragile-they are not.
Then, I just started layering. Of course, I made a banner out of the biggest piece of paper. That seems to be my trademark for layouts.
Once I had the paper laid out like I wanted it I began grabbing pieces of ephemera and adding it to the page.
As you can see in the close ups, I added some random stamping using stamps from my stash as well as past Swirlydoos kits. When you are to the end of a kit, cardstock is the go to for the background so I use stamps, sprays, and other mediums to add dimension and character to the plain cardstock.
A trick I learned from Kathi while at camp one year is to use your box instead of pop dots to add dimension. I never throw my kit box away anymore! I use it to pop up layers on my pages. And, as you've heard others say, it does make it easier to tuck in little bits and bobs on your page.
So, this is what's left of a kit box! I used it to pop up the clock and other layers on the page.
Now, I grabbed the stickers I had left from the kit and stuck them down behind the layers that are still just laying on the page.
Once the stickers and stamping were done, I took a picture with my phone so I would have a reference for how this was laid out. Then, I started gluing everything down.
I did have a picture in mind when I started this bare bones layout but many times I do not. I don't like being limited in my creativity by the picture so many times I will create the layout first, then go back and find a picture that works for the page. Since I print my pictures at home, I am free to crop and print to any size that works.
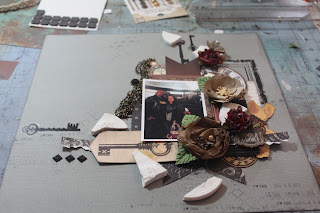
Here's some close ups so you get and idea of the layers.
I did add some flowers from my stash. They were all flowers from past Swirlydoos kits.
And, the final touch is adding a title or journaling.
Well, that's a peek into the process of scrapping with the scraps. Please share your before and after pictures with me! I'd love to see what you create with the scraps on your table!
Thanks for stopping by the blog today. Don't forget to check out the boutique to snag your kit today. Sold Out? Become a subscriber and never miss another perfectly coordinated kit again. How do you do that? See below.
If you’re ready to start getting perfectly coordinated, top of the line scrapbook kits delivered to your door, please visit us at www.swirlydoos.com. Mention my name (Jan Penny) when you subscribe and you’ll receive 10% off your first kit, AND a coupon good for 30% off your entire purchase in the Swirlydoos.com store!
Subscribe to:
Post Comments (Atom)
Swirlydoos Site Links
Pin Us!!
Popular Posts
-
Welcome to Swirlydoos' Mystical Winter kit reveal Blog Hop Block Party!! Happy New Year and Welcome!!! This month's kit,...
-
It's the big re ve al ! Say hello to our December kit! Be sure to check out a video "tour" of the main kit, kit add ons an...
-
Welcome!!! Today is a beautiful day to reveal our April kit, Whispers of Spring. Take a look at how pretty this kit is! I have to tel...
-
Boy, oh boy do we have a stellar hop for you this month!! Just when I think that Krissy couldn't possibly created a prettier ki...
-
Say Hellllllllloooooo to our October kit, Belle Chanson! Welcome to our October kit reveal and Blog Hop. We have some new and exciting...
-
It's time to unveil our April Swirlyhues Challenge! Your beautiful hostess this month is the uber talented Paulien! Here is the ...
-
We KNOW you love to scrapbook, BUT, do you have a gift for sharing your ideas and techniques with others? Are you a multi-talented multi-t...
-
Welcome to Swirlydoos' March Kit Reveal Blog Hop Block Party!! We have some amazing projects for you to see today and as a bonus...
-
Today we are unveiling our June SwirlyHues Challenge, and announcing our Blog Hop Winners!!! This month's SwirlyHues Hostess is non...
-
Today is the last day that you can submit projects for our December SwirlyHues Challenge. The DT will begin voting tomorrow and the winne...
Blog Archive
- 2017 (134)
- 2016 (173)
-
2015
(169)
- December(19)
- November(20)
- October(16)
- September(13)
- August(12)
-
July(11)
- *July Blog Hop Winner*
- July Challenge Highlights
- July Reveal and Blog Hop
- June Challenge Highlights
- Scrap your scraps
- DESIGN/EDUCATION TEAM CALL!!!
- *Designer Spotlight* with Kim featuring June Boys ...
- June kit inspiration with Helena
- June Kit Reveal with Jan, Boy's Night Out
- June Kit Reveal, Boys Night Out, with Maggi
- SWIRLYDOOS MARCH, APRIL, MAY AND JUNE KITS NOW AVA...
- June(10)
- May(9)
- April(13)
- March(14)
- February(13)
- January(19)
- 2014 (230)
- 2013 (207)
- 2012 (252)
- 2011 (181)
- 2010 (118)
- 2009 (38)


3 comments:
Thanks for sharing the process you go through to create a LO from scraps! It looks awesome!
Friggin Jan you ROCK!! Love how you use it to the last drop. WTG on 7 lo's
Paula
Jan, this is a wonderful step-by-step, thanks for posting.